Camera interface - Config: Alarm tile
This handles basic motion and exception alarms.
- Motion Detection
- Exception Alarm
- Alarm In
- Alarm Out
- Audio Alarm
- Light Alarm
Motion Detection
This is for basic motion detection. For advanced AI detection such as line crossing and area intrusion, see the Alarm Out.
Pro Tip: This is easily handled using OvrC. Go to the camera's Device Details tab and use Activity Zones.
Detection Config tab
This configures how the camera reacts to the events.
Enable (if present): This box must be checked to edit anything else on the page.
Alarm Holding Time: This continues the alarm even after the event that triggers it ends (for example, if someone opens and quickly shuts a door sensor).
Alarm Out: If your camera is equipped with physical alarm out connections, enabling this has the camera send the alarm.
Trigger SD Card Snapshot (if an SD card is present): Sends a photo of what triggered the alarm to the SD card.
Trigger SD Recording (if an SD card is present): Records to the SD card for the duration of the alarm.
Trigger Email: This opens a dialog in which you can list email addresses to receive the alert, set that email’s subject line and body text, and decide whether to attach a photo of the incident.
Trigger FTP: Add the server address for the FTP site, and the camera uploads any alert recordings to that site for remote viewing.
Click Save when finished.
Area and Sensitivity tab
This section replicates the Activity Zones feature found in OvrC.
The only extra functionality here is the Invert button, which switches each grid square between active and inactive.
Schedule tab
This opens the schedule tool for motion detection.
Exception Alarm
This section sets how the camera reacts to internal events that interfere with surveillance. For external interference, see Video Exception.
There are tabs for:
-
SD Card Full (no space to record)
-
SD Card Error (a flaw prevents recording)
-
IP Address Collision (a problem at the router or switch)
-
Cable Disconnected (a physical disconnect)
They all work the same way, though some tabs do not have all of the controls.
Each tab configures how the camera reacts to that event.
Enable (if present): This box must be checked to edit anything else on the page.
Alarm Type: Choose either normally open or normally closed.
Alarm Holding Time: This allows the alarm to continue after the event that triggers it ends (for example, if someone opens and quickly shuts a door sensor).
Sensor Name: To aid in troubleshooting.
Alarm Out: If your camera is equipped with physical alarm out connections, enabling this has the camera send the alarm.
Trigger SD Card Snapshot (if an SD card is present): Sends a photo of what triggered the alarm to the SD card.
Trigger SD Recording (if an SD card is present): Records to the SD card for the duration of the alarm.
Trigger Email: This opens a dialog in which you can list email addresses to receive the alert, set that email’s subject line and body text, and decide whether to attach a photo of the incident.
Trigger FTP: Add the server address for the FTP site, and the camera uploads any alert recordings to that site for remote viewing.
Click Save when finished.
Alarm In
Certain models have alarm contacts on their pigtail (for door sensors, etc.). This configures what the camera does when an alarm reaches it through the pigtail.
Detection Config tab
This configures how the camera reacts to an incoming alarm.
Enable (if present): This box must be checked to edit anything else on the page.
Alarm Holding Time: This continues the alarm even after the event that triggers it ends (for example, if someone opens and quickly shuts a door sensor).
Alarm Out: If your camera is equipped with physical alarm out connections, enabling this has the camera send the alarm.
Trigger SD Card Snapshot (if an SD card is present): Sends a photo of what triggered the alarm to the SD card.
Trigger SD Recording (if an SD card is present): Records to the SD card for the duration of the alarm.
Trigger Email: This opens a dialog in which you can list email addresses to receive the alert, set that email’s subject line and body text, and decide whether to attach a photo of the incident.
Trigger FTP: Add the server address for the FTP site, and the camera uploads any alert recordings to that site for remote viewing.
Click Save when finished.
Schedule tab
This opens the schedule tool for receiving alarms.
Alarm Out
This allows the camera to send out an alarm through its pigtail.

There are four Alarm Out Modes:
-
Alarm Linkage: The camera is directly linked to the other device via the phoenix connector in the camera's tail. You must also enter the alarm's name in the Alarm Out Name text box.
-
Manual Operation: This lets the operator manually trigger or cancel an alarm.
-
Day/night switch linkage: This controls the alarm based on the camera switching between day mode and night mode.
-
Timing: This controls the alarm based on time of day using the Schedule tool.
Schedule tool
This opens the schedule tool for sending alarms.
Audio Alarm
Note: This menu option only displays if the camera is equipped with active deterrence.
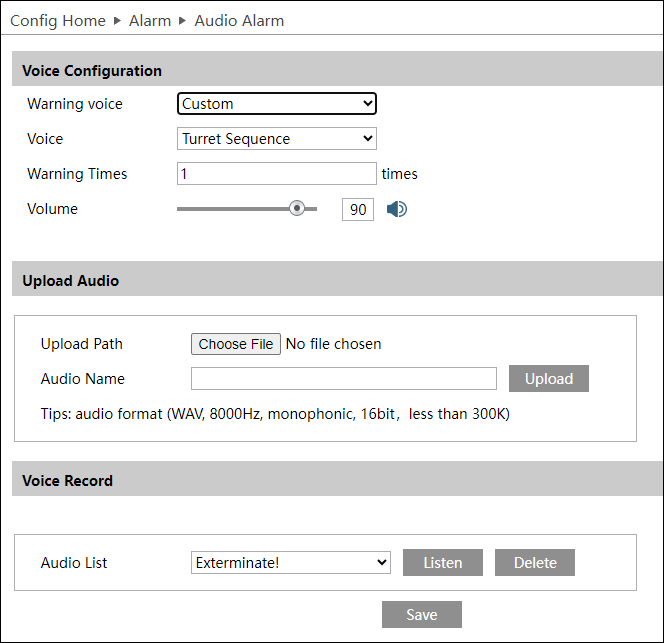
Sound Configuration tab
Under Voice Configuration, select a language and message for a variety of AI-generated voice warnings, then select a repeat and volume.

To add a custom audio file, Select "English" and "Custom" to open this dialog:
Here you can upload an existing audio file from your computer and give it a name to be used in the selection dropdown, or record an audio file using your computer's microphone.
Schedule tab
This opens the schedule tool for the audio alarm.
Light Alarm
Note: This menu option only displays if the camera is equipped with active deterrence.
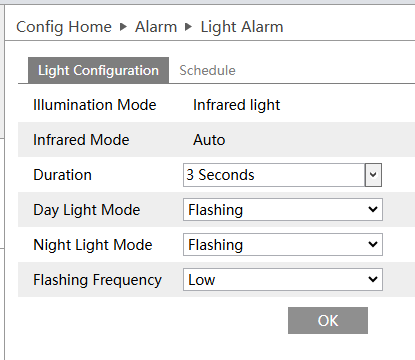
Light Configuration tab
Illumination Mode and Infrared Mode (which displays if the illumination mode is set to infrared) display the camera's current setting. In other words, this shows what the camera is currently doing, not what it will do when the alarm is triggered.
Duration is how long the light alarm remains active once triggered.
Day Light Modeand Night Light Mode set the camera's action when an alarm is triggered. The camera's action is based on the camera's light mode setting at the moment the alarm triggers.
Flashing Frequency sets the speed at which the light strobes.
Schedule tab
This opens the schedule tool for the light alarm.