NVR web interface - Function: Account and Authority
This section handles the system's HDDs.
- Account
- Security
- User Status
Account
Only the Administrator account and users that have the “Account and Authority” permission can manage the system’s accounts. The Administrator group has all permissions, and its permissions cannot be changed.
Edit User
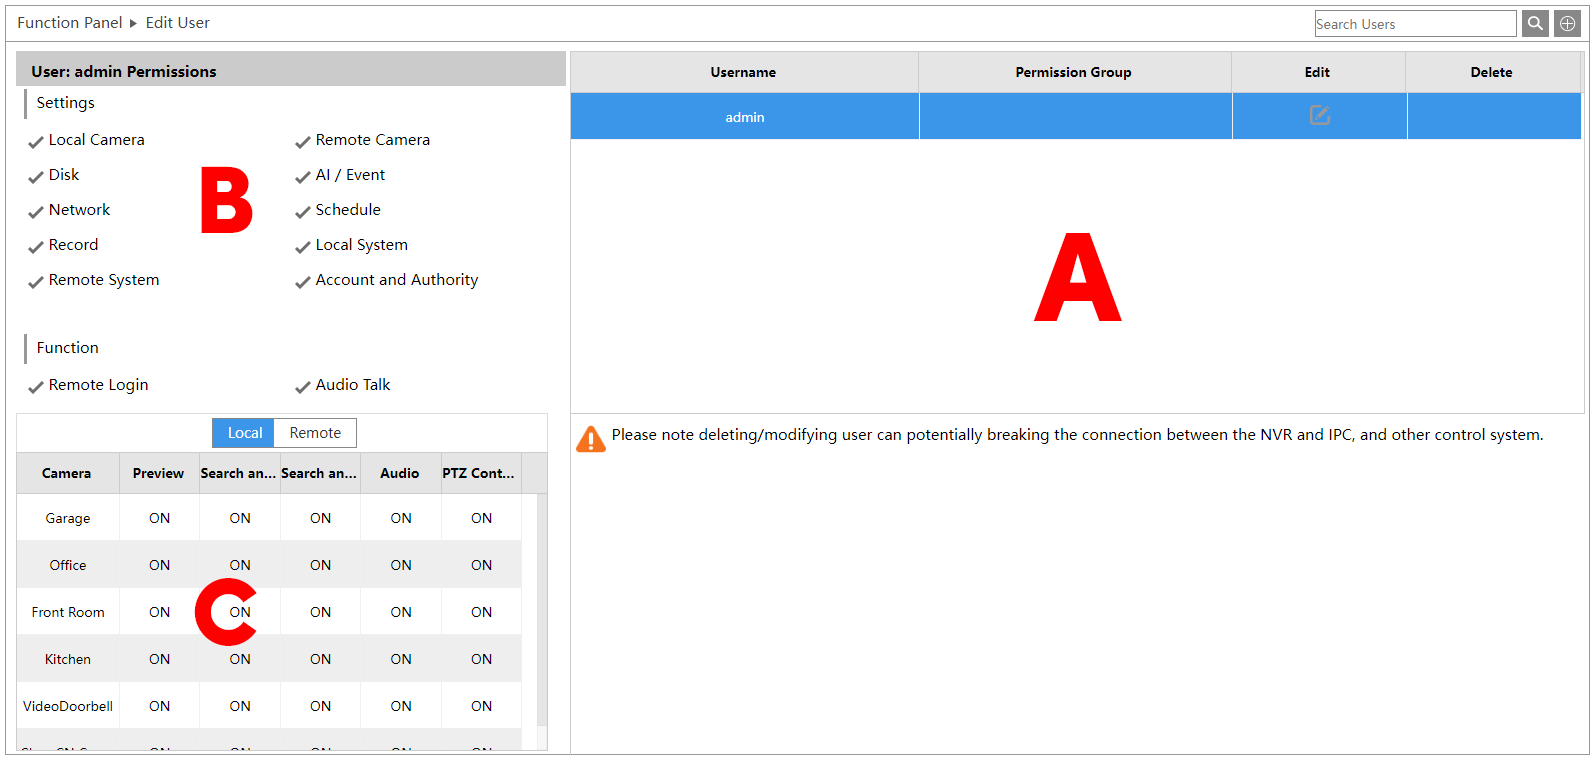
At right, this displays the user list (A). You can search this table with the tool at the top right.
Click a user in the list to display its user permissions in the tables (B and C) at left. You can edit this user's permissions as desired:
-
Local Camera: Access cameras connected to a port in the NVR.
-
Remote Camera: Access cameras connected via a network switch.
-
Disk: Allows access to the Function Panel > Disk page.
-
AI / Event: Allows access to the Function Panel > AI/Event page.
-
Network: Allows access to the Function Panel > Network page.
-
Schedule: Change camera schedules and edit schedule details.
-
Record: Manually record video feeds.
-
Local System: Access the NVR's local interface.
-
Remote System: Access the NVR's web interface.
-
Account and Authority: View and edit the Account and Authority pages.
-
Remote Login: Access the system from off site.
-
Audio Talk: Broadcast audio to a camera's local speaker.
-
Camera table: Enable or disable specific functions by camera.
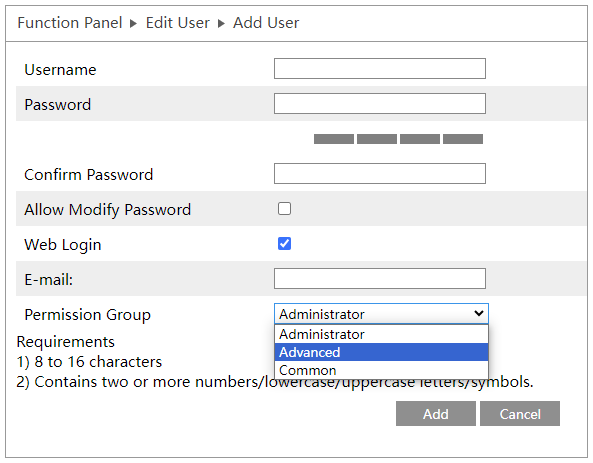
To add a user, click the + icon next to the search box in the top right to open the Add User dialog.
Set the parameters of the new user. The Permission Group option sets the user's permissions to match those of the group. You can customize the user's permissions afterward.
There are three default permission groups (Administrator, Advanced, and Common) available for accounts. You can manually edit these or add a new permission group under Permission Management.
Pro Tip: You cannot delete the Administrator account. You can still change the Administrator password by clicking Modify Password.
Permission Management
Click on any permission group to view its permissions (remember, you can edit individual permissions after creating a new user).
Click the Edit icon to edit a group's name or permissions. Click the Save As icon to create a copy of that group.
To add a new group, click the + icon at the top right. Type the group's name and select the default permissions.
Click the trashcan to delete a group (other than the three default groups).
Security
Block and Allow List
Here you can block all internet connections except those you specify (white list) or allow all internet connections except those you specify (black list).
Check Enable, then select the list you want to use.
Click Add IP or Add MAC. In the pop-up, check Enable. Enter the IP (or IP segment) or MAC address and click OK. In the list itself, click the edit or delete icons to adjust the entries.
Preview on Logout
For each camera, enable or disable the preview permission. If a camera’s permission is ON, you can view the live image of the camera while logged out of the system; if OFF, the camera cannot be viewed unless you log in first.
To preview a camera feed, either click the camera in the list at right, or select it in the dropdown at left.
Network Security
ARP Guard: Address Resolution Protocol Guard protects the LAN from APR attacks and keeps the network stable. If enabled, you can enable auto gateway MAC or manually set gateway MAC. Enable detection defense as needed.
Auto Gateway MAC: Enable this to restrict the system to using one specific router for internet connection.
Detection Defense: Enable this to allow the system to monitor traffic for suspicious behavior.


