NVR local interface - Settings: Disk
Here you manage recording settings and encryption, and monitor disk health.
Warning: Use only surveillance-rated hard drives like Western Digital Purple Pro drives. Each bay can hold a drive up to 18 TB.
- Disk Management page
- Storage Mode page
- Information page
Disk Management page
You can insert or remove HDDs while the NVR is on (though you should avoid it if possible).
Disk Management tab
You can view the NVR’s disk number, size, etc., in the table. If an HDD is in an abnormal state, information about the error appears under the Status tab.

Press the Format button to initialize the disk.
Encrypting a disk
You can encrypt the hard drive as follows:
-
Click Data Encrypt at the bottom right of the screen.
-
Enter your credentials. This account must have permission to perform disk management.
-
Select the disk you want to encrypt and then enter a password for the disk.
After you encrypt the data of a disk, this disk cannot be read by other NVRs unless it is unlocked as follows:
-
Click Change Encrypt.
-
Enter your credentials. This account must have permission to perform disk management.
-
Select the disk you want to decrypt and then enter the password.
-
Click Close Encrypt.
Unlocking a disk
When an encrypted disk is transferred to another NVR, its status shows as "locked." Select the disk and click Unlock. After entering the encryption credentials, its status changes to Read Only and you can view the disk data.
Storage Mode page
Storage Mode Settings tab
Here you can assign disk groups, which let you assign select cameras to record to specific disks.
All disks and cameras are added to group 1 automatically, though you can modify assignments. There cannot be more groups than HDDs.
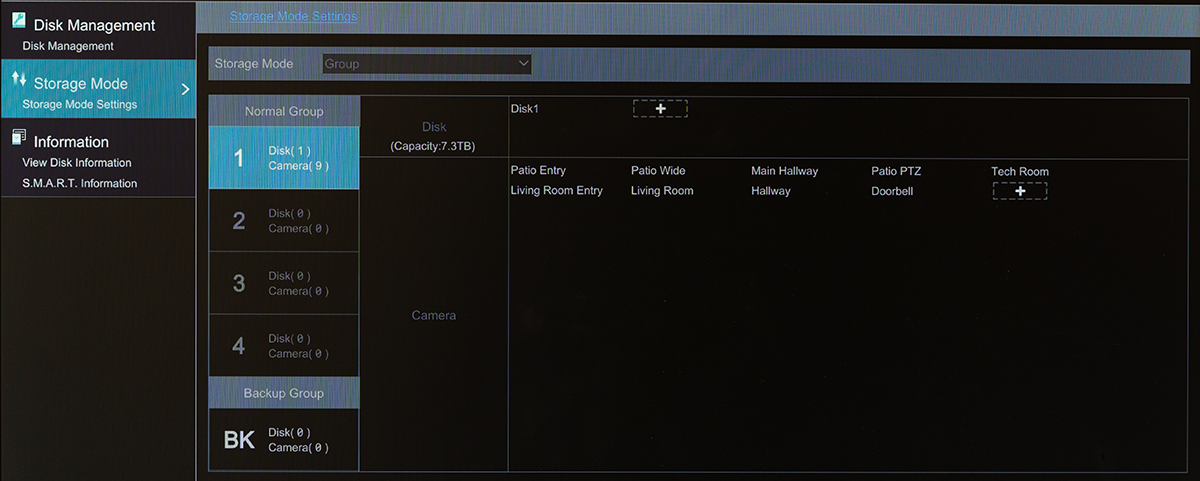
Each group can add disks and cameras from other groups. To create a new group, select a disk group by clicking on it in the left column and then click the + button in the disk or camera row. This opens a pop-up where you use the checkboxes to select the disks or cameras and then click Add.
To delete disks and cameras from a group, select a disk group and then click on the top right corner of the added disk or camera to delete it. Deleted disks and cameras move into group 1 automatically, which means you cannot delete them from group 1.
Pro Tip: Each HDD and each camera can only be in one group.
For the models with 2 or 4 HDD slots, the BK ("backup") group can be added as shown below.
Click to add the backup HDD. After account verification, select a HDD and then this HDD will be removed from the normal group to the backup group. Simultaneously, it will be formatted. Please back up all data of this HDD in advance when you want to remove it to the backup group.
You can add cameras to this HDD. The added cameras can exist and be recorded both in one HDD of the normal group and the backup group.
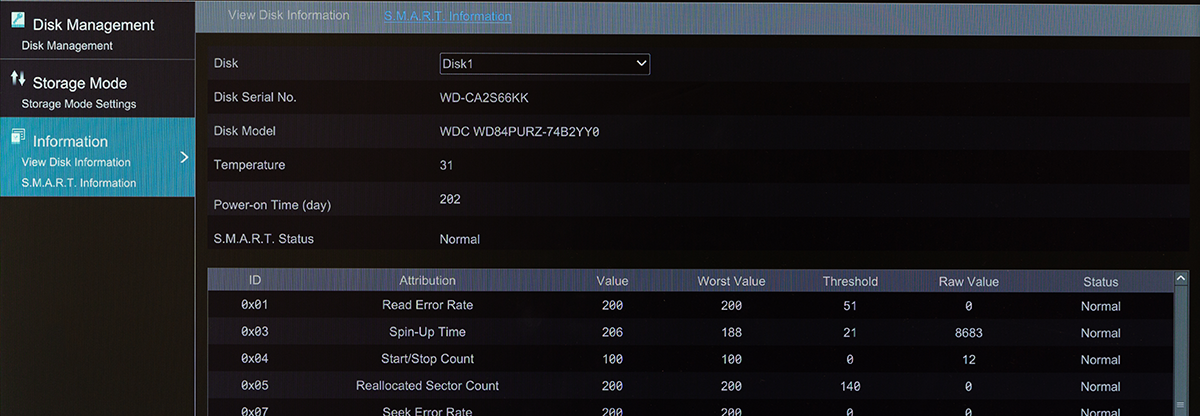
Information page
View Disk Information tab
This gives basic information about the disk and its parameters.

S.M.A.R.T. Information tab
Here you can view the working status of each HDD. Select a disk from the dropdown at top to view its details.
If you need to check whether someone has unplugged or moved the disk, view the log under the System menu.