Camera interface - Config: System tile
This tile covers informational and administrative tasks.
Contents:
-
Basic Information - Useful for troubleshooting
-
Date and Time - Set it here
-
Local Config - Add bitrate to your OSD
-
Fisheye (for fisheye cameras only) - set the installation and display mode
-
Storage - Manage your recordings
Basic information
This gives you information about the camera and its firmware. You may be asked for this information when receiving technical support.
This is all self-explanatory, with the possible exception of Device ID,which is used for P2P communications.
Date and Time
Time settings are typically pushed by your camera’s NVR. If you have an NVR. we recommend you do not edit these here.
Pro Tip: The OvrC interface is a much easier way to set date and time.
Zone tab
Set the customer’s Time Zone, choose whether or not to use Daylight Saving Time, and, if used, whether to let the system calculate it, or enter the data yourself.
Date and Time tab
Here you can set these for your camera, as well as format the time display. We recommend that you synchronize time settings with the NTP server.
Local Config
Activate the Show Bitrate option to show the bitrate of the camera on its OSD.
Fisheye
Fisheye Parameters (Fisheye only): Configure the stream mode and installation parameters.
Note: In the Fisheye interface, set the stream mode and installation method via Config > System > Fisheye > Parameters menu before viewing the live image.
Stream modes:
-
Fisheye
-
Panoramic
-
Fisheye + 3PTZ
-
Panoramic + 3PTZ

Installation method:
-
Wall
-
Ceiling
-
Desktop
Warning: Occasionally, ePTZ controls may not behave as expected. If you experience this, try using the diagonal controls instead.
Storage
Here you manage your recordings.
Management tab
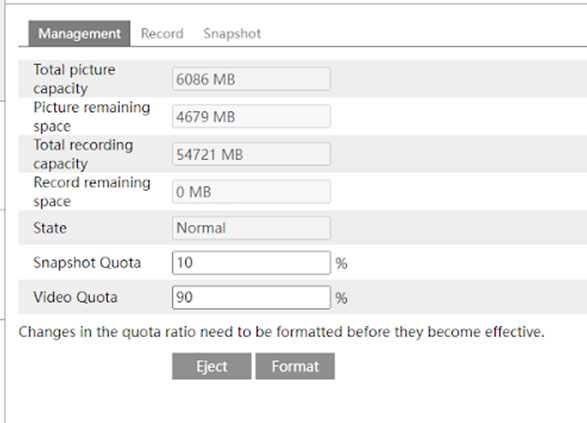
In the Management tab, you can review the capacity of your SD card. The only item here that is editable is the ratio of space reserved for video and snapshots.
If you change the ratio, click Format to save those changes.
When swapping out your SD card, click Eject so the camera safely forgets the item.
Record tab
In the Record tab, you select which data gets sent to the SD card for preservation.
In the Record Stream dropdown, select which stream you want sent.
Pre-Record Time lets you add extra video (taken before an event occurs) to the recording of that event. Your camera always has several seconds of video stored in its memory as it analyzes the feed for motion, etc. When an event occurs, it can add some of this video to the front of the event to add context to the recording.
Cycle Write determines whether new recordings can overwrite old recordings.
Enable Schedule Record has the camera use the schedule you detail in the calendar below; the default schedule is to record events 24/7. Instructions for the schedule tool are at the bottom of the page.
Click Save before leaving this page.
Snapshot tab
In the Snapshot tab, you select which data gets sent to the SD card for recording.
Under Snapshot Parameters, in the Image Format dropdown, select which stream you want sent.
Resolution is where you choose the image size.
Image Quality sets the level of compression. Low quality means high compression (and therefore small file size), and vice versa.
Under Event Trigger, Snapshot Interval tells the camera how frequently to take a photo once an event is triggered. Snapshot Quantity tells the camera how many photos to take once an event is triggered.
Under Timing, Enable Timing Snapshot tells the camera to take snapshots on a regular basis based on the schedule outlined below. Snapshot Interval tells the camera how frequently to take a photo during its normal recording schedule.
The schedule tool
This opens the schedule tool for taking snapshots.