Settings
System
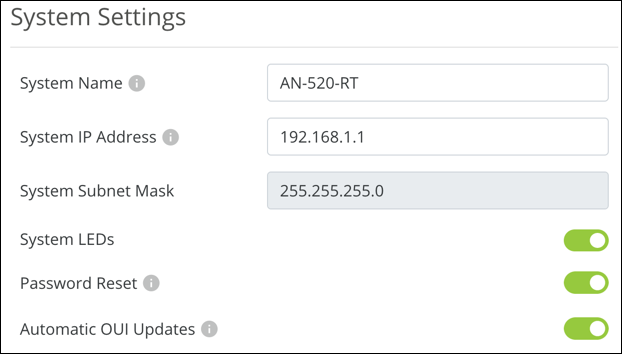
System Settings
-
System Name — Also known as the hostname. The router’s model number is used by default. This field accepts alphanumeric (a - z and A - Z) characters, hyphens ( - ), underscores ( _ ), and periods.
-
System IP Address — Enter a LAN IP address of the router using IPv4. (IPv6 options are found under Advanced > IPv6).
-
System Subnet Mask — Displays the subnet mask of the router’s default DHCP pool. This is configurable under System > LAN.
-
System LEDs — Toggle the router’s LEDs on or off.
-
Password Reset — Enabled by default. Disabling this feature removes the ability to use the Reset button's 10-19 second Password Reset function.
-
Automatic OUI Updates — Enabled by default. If disabled, the router relies on the embedded OUI table to display manufacturer names in the Client table.
Time Settings
The router uses an NTP (Network Time Protocol) server to automatically set the router’s time. Use the Time Zone and NTP Server dropdown to modify these settings.
By default, the router uses the NIST (National Institute of Standards and Technology) servers to synchronize to Coordinated Universal Time.
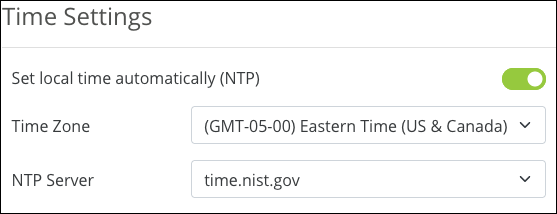
Toggle set local time automatically (NTP) to manually enter the date and time.
Pro Tip: Do not set the time manually unless the router is being used without an internet connection. Any device’s internal clock can drift, which causes network issues.
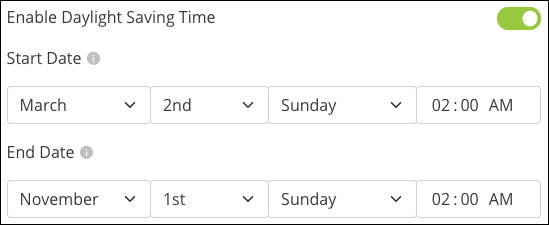
You can toggle Enable Daylight Saving Time on or off. Use the Start and End Date dropdowns to configure the proper times for your part of the world. Check local regulations before configuring Daylight Saving Time.
Auto-Reboot
Enable Auto-Reboot to create a schedule for the router to restart regularly to help ensure the router is always up and functioning for the client.
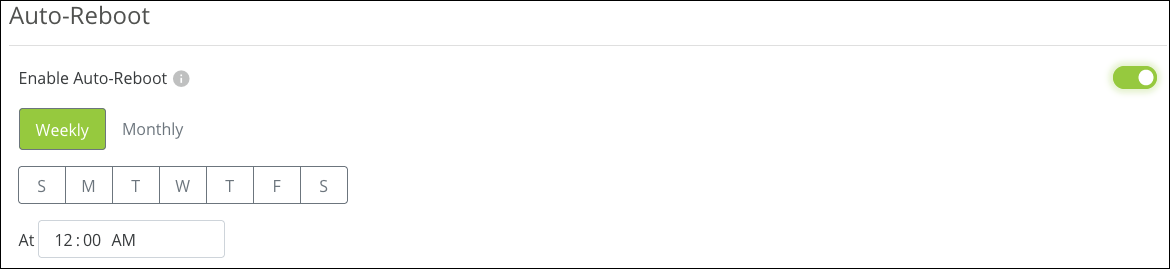
Pro Tip: Set Auto-Reboot to restart the router in the early morning hours when the network is not being used. If you have other devices configured to auto-reboot, don't set them all to restart at the same time.
The network devices should start in an order that ensures every device obtains an IP address. For example, the modem should power on first, then the router, core switch, intermediate switch, then the AP, etc.
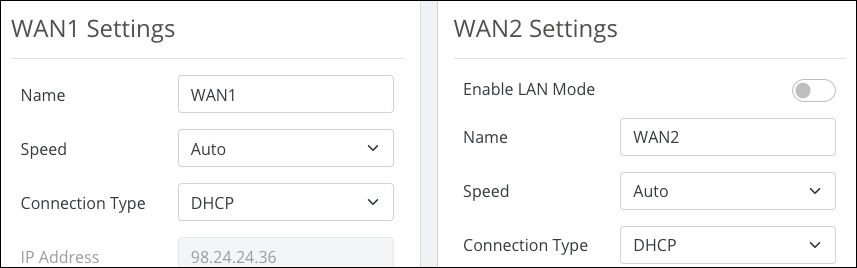
WAN
WAN Settings
-
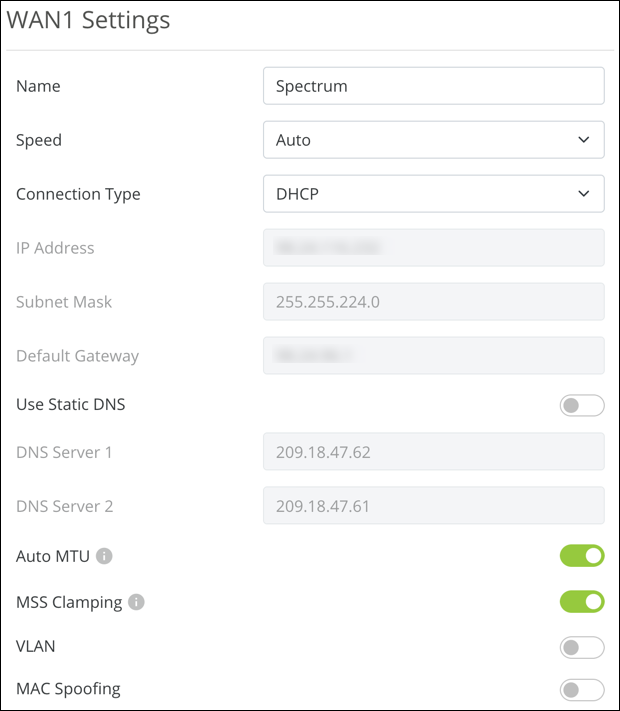
Name — Type to enter a new name for the WAN port, such as the name of the internet service, if you’re using two WAN connections. This field accepts alphanumeric (a - z and A - Z) characters, hyphens ( - ), underscores ( _ ), !, @, #, $, %, ^, &, *, (,), ?, +, and periods.
-
Speed — Use the dropdown to select a specific connection speed or to disable the port. Options include Auto, 2.5Gbps, 1Gbps, 100Mbps, 10Mbps, and Disabled.
-
If 100 or 10Mbps are selected, you may set the WAN ports Duplex to Full or Half.
-
-
Connection Type — Set to DHCP by default, options include Static, PPPoE, and Transparent Bridge.
-
PPPoE includes fields for the Username, Password, a Keep Alive toggle, and the Redial Period. This option is typically used with DSL and other peer-to-peer Internet Service Providers (ISPs). The PPPoE password can have a maximum of 63 characters which include This field accepts alphanumeric (a - z and A - Z) characters, hyphens ( - ), underscores ( _ ), !, @, #, $, %, ^, &, *, (,), ?, +, =, and periods.
-
Transparent Bridge requires an Internal LAN IP Range, an IP Address for the router to adopt, a Subnet Mask, a Default Gateway, and DNS Servers to be manually entered. Transparent Bridge disables all routing functions or your router. Use this feature if you must use an ISP-provided router on the network.
-
-
IP Address — Editable when you select a Connection Type other than Auto.
-
Subnet Mask — Editable when you select a Connection Type other than Auto.
-
Default Gateway — Editable when you select a Connection Type other than Auto.
-
Use Static DNS — Toggle on to manually enter a value for DNS Server 1 and 2.
-
Auto MTU — Leave this enabled for optimal performance. The MTU (Maximum Transmission Unit) specifies the largest packet or frame allowed to be transmitted across the WAN interface.
-
MSS Clamping — Enabled by default, MSS (Multiple Segment Size) Clamping makes outgoing traffic handle differing MTU values along the traffic path. This is commonly used with PPPoE.
-
VLAN — Enable to enter a VLAN ID for the WAN port.
-
MAC Spoofing — Disabled by default, enable to enter a MAC address for the WAN interface to use.
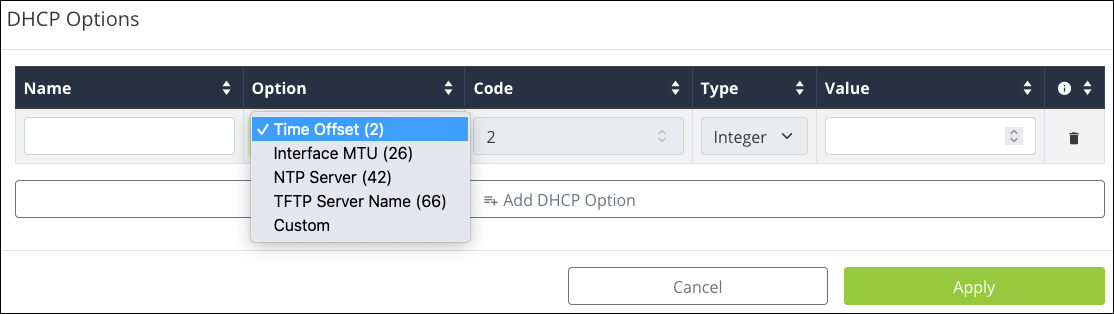
DHCP Options
DHCP options are commonly used with VoIP (Voice Over IP), as certain manufacturers require specific DHCP options for the system to work. Common DHCP options are given to assist with the configuration.
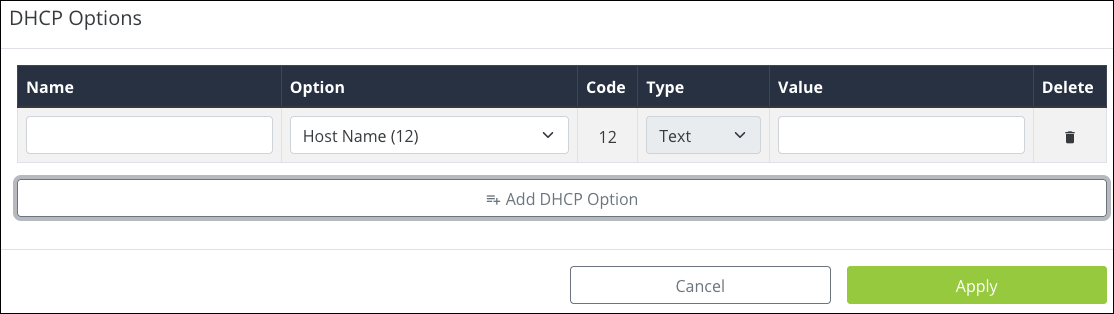
Click Add DHCP Option to configure a new setting. Consult the service you’re configuring for more information.
Release & Renew
Click to Release the current WAN IP address to the DHCP pool and receive a new one or Renew the current WAN DHCP connection. The WAN IP address may or may not change.
Note: The Release and Renew buttons only work if the WAN type is DHCP or PPPoE.

Note: The WAN speed is highlighted at the bottom of the WAN tile. If this is gray then the router does not detect a WAN connection.
Multi-WAN (520 router only)
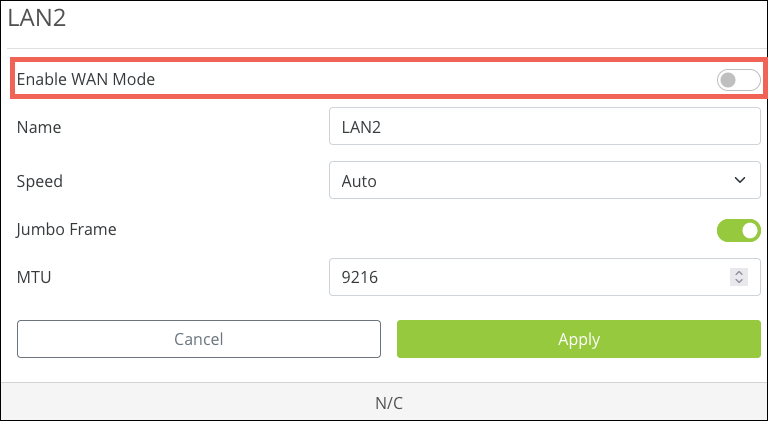
To use WAN2 you must go to Settings > LAN and click on LAN 2 at the top of the page, then click the Enable WAN Mode toggle.
Go back to Settings > WAN to configure the WAN2 settings and enable Multi-WAN.
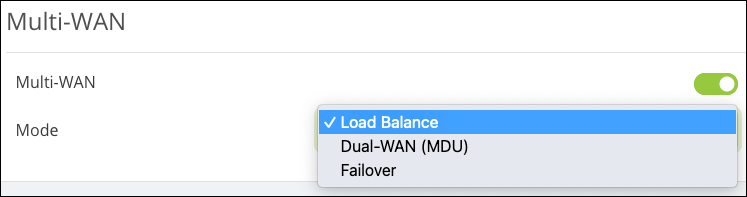
The Multi-WAN feature has three modes:
-
Load Balance — Evenly distributes the bandwidth from two WAN connections to the LAN. When enabled, you can route traffic to specific WAN interfaces using advanced features like Route Binding or ACLs.
Note: Load balancing marks the flow of traffic from both WAN ports with a random probability of 50%, instead of marking each flow as WAN1 and WAN2. This does not apply to route binding rules.
-
Dual-WAN (MDU) — Multiple Dwelling Unit (MDU) should be selected if the router is being used within a complex with multiple residences, like a condominium. Enable this feature in the router if it’s being fed from the head router of an MDU. Connect WAN1 to the ISP and WAN2 to the callbox network.
Note: When enabled, go to Settings > LAN > click the LAN 1 icon and disable Jumbo Frame.
-
Failover — Logs and then fails over to the secondary WAN interface. The router fails back to the primary WAN when its connection is restored.
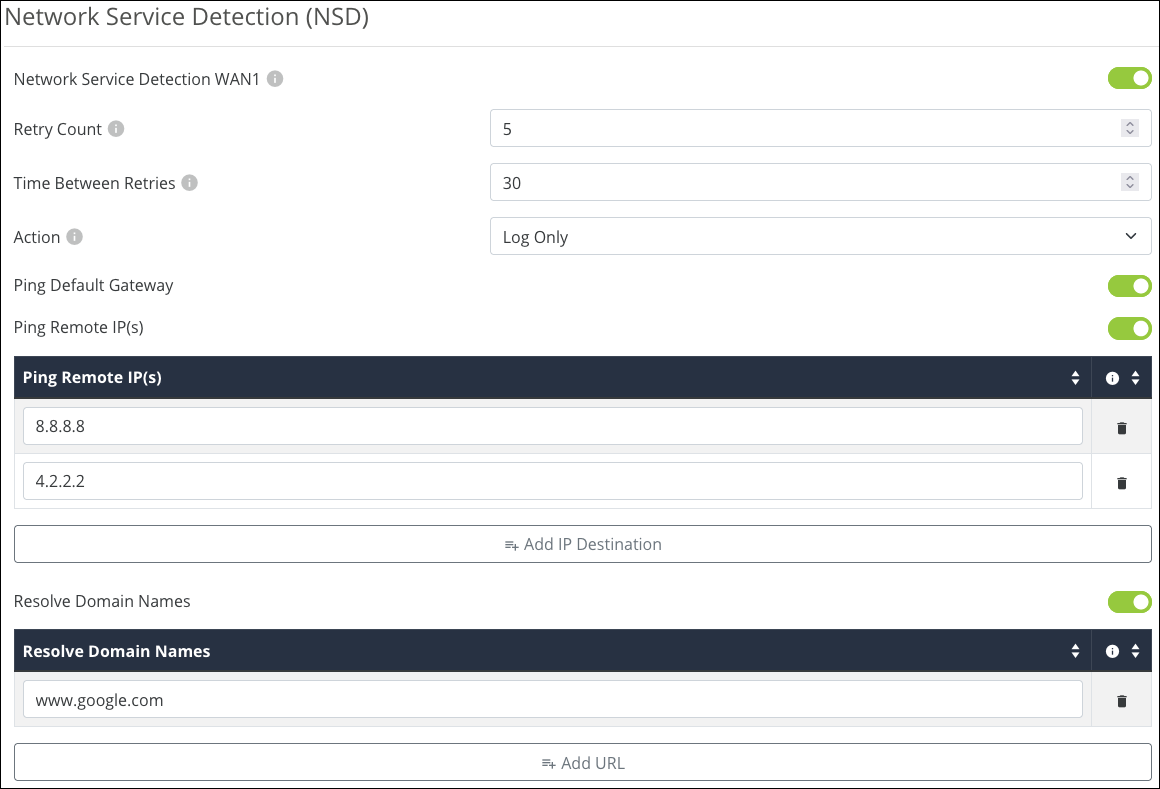
Network Service Detection (NSD)
Toggle on to configure the detection system used to determine if the WAN port is down, and what actions the router should take.
Note: All configured conditions must be met for NSD to take Action. If Ping Remote IPs and Resolve Domain Names are configured, but only the pings are failing, NSD will not fail over.
-
Retry Count —The number of times the router must fail to reach the specified IP Address(es) and/or Domain Names before taking the Action specified.
-
Time Between Retries — The amount of time in seconds between attempts to reach the specified IP Address(es) and/or Domain Names.
-
Action — Determines what happens when the WAN interface does not detect a connection. Options include:
-
Log Only — Logs the events in the System Log.
-
Log and Reboot Interface — Logs the events in the System Log and restarts the interface (port).
-
-
Ping Default Gateway — Enabled by default. This tells the NSD to try pinging the gateway address that’s providing an IP address to the WAN port.
-
Ping Remote IP(s) — Enable to ping IP addresses other than the default gateway. Do not enter local IP addresses. You can change the default remote IPs by typing in the field or add further IP addresses by clicking Add IP Destination.
-
Resolve Domain Names — Enable to use a domain name instead of IP addresses, like www.google.com. Click Add URL to add more domain names to ping.
LAN
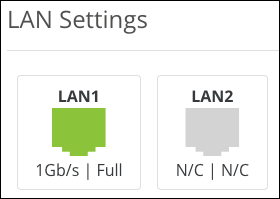
LAN Settings
The LAN Settings display the LAN ports, their speed (color coded), and their duplex settings. Each port is color-coded based on its negotiated speed:
-
Gray — The port is not detecting a connection.
-
Red — The port is disabled.
-
Orange — The port detects a 10/100Mbps connection.
-
Green —The port detects a 1Gbps connection.
-
Blue — The port detects a 2.5Gbps connection.
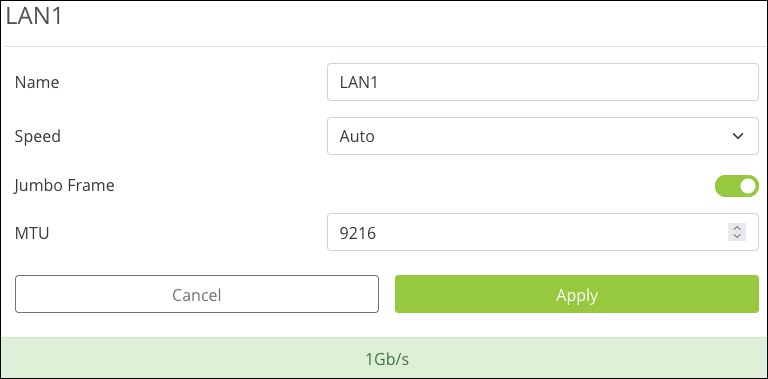
Click on a port to open a new window to configure the port’s Name, Speed, and enable Jumbo Frames. The MTU (Maximum Transmission Unit) can be edited when Jumbo Frames are enabled. The MTU sets the maximum size of each packet (in bytes) that can be transmitted.
LAN 2 (520 routers only) has an Enable WAN Mode option to enable the multi-WAN feature.
How the MTU is determined across multiple LANs
Each VLAN on the router has its own bridge. The MTU of each bridge is determined by the lowest MTU value among its associated interfaces.
Example: If VLAN1 is configured as Untagged on LAN1 and LAN2. LAN1 has an MTU of 1500 and LAN2 has an MTU of 9216. VLAN1 is going to use the LAN1 bridge with an MTU of 1500.
If VLAN1 is Excluded from LAN1, then the VLAN uses the LAN2 bridge with an MTU of 9216.
Pro Tip: Use ACLs for more control. ACLs have a higher routing priority than InterZone Forwarding rules and can be more specific about the traffic allowed between VLANs. For example, an ACL can permit traffic from a device on VLAN1 to a device on VLAN2, even if InterZone Forwarding is configured to restrict that communication.
DHCP Server Settings
Click a DHCP card to edit the settings or click Add a DHCP Server to configure a new one.
![]()
This opens a new window with configurable settings.

-
VLAN ID — The VLAN ID is assigned to the DHCP server. This cannot be changed for the default DHCP server.
-
Name — Enter a name for the DHCP server. This field accepts alphanumeric (a - z and A - Z) characters, spaces, hyphens ( - ), underscores ( _ ), !, @, #, $, %, ^, &, *, (,), ?, +, and periods.
-
Default Gateway —The IP address of the router for this DHCP server. Device Management must be enabled on the VLAN ID to access the router at this address.
-
Subnet Mask — Type in this field to edit the Subnet Mask.
-
DHCP Mode — VLAN1 is set to Server, by default, to allow the router to hand out DHCP requests to connected client devices. When creating new VLANS, your options are:
-
Server — Allows the router to hand out DHCP requests to connected client devices.
-
None — The DHCP server cannot hand out DHCP requests.
-
Relay — Forwards DHCP requests to a separate device acting as the DHCP server.
-
-
IP Range — Enter the beginning and end address of the IP range the DHCP server can assign to connected clients.
-
Lease Time (Minutes) — The amount of time before the DHCP server renews the IP of a client device. The client may receive a new IP address or the old one again.
-
DNS Server Mode — Set to Proxy, by default. This provides the Gateway IP address as the DNS server to DHCP clients. Setting the DNS Server Mode to Static allows you to designate a specific DNS server to the DHCP clients.
-
DHCP Options — Select which DHCP options should be used with the DHCP server.
DHCP Options
DHCP options are commonly used with VoIP (Voice Over IP), as certain manufacturers require specific DHCP options for the system to work. Common DHCP options are given to assist with the configuration.
Click Add DHCP Option to configure a new setting. Consult the service you’re configuring for more information.
VLAN Settings
The VLAN Settings button takes you to the VLAN Settings page under Advanced > VLANs.
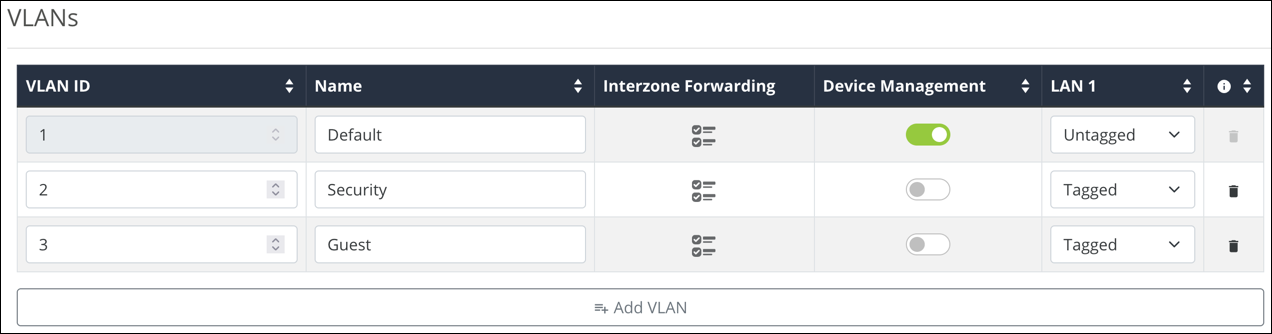
To create a new VLAN, click the + Add VLAN button, and configure the below settings:
-
VLAN ID — A unique numerical identifier for the VLAN between 1 and 4095. The default VLAN is always set to 1. The maximum number of VLANs is listed below:
-
For AN-220 routers, 32 total VLANs.
-
For AN-520 routers, 48 total VLANs.
-
-
Name — Enter a name that describes what the VLAN is being configured for. Like a Guest network or Surveillance devices. This field accepts alphanumeric (a - z and A - Z) characters, hyphens ( - ), underscores ( _ ), !, @, #, $, %, ^, &, *, (,), ?, +, and periods.
-
InterZone Forwarding (Previously InterVLAN Routing) — Click the
 icon to configure communication between client devices connected to the VLANs. Do not use this feature if security between VLANs is a concern.
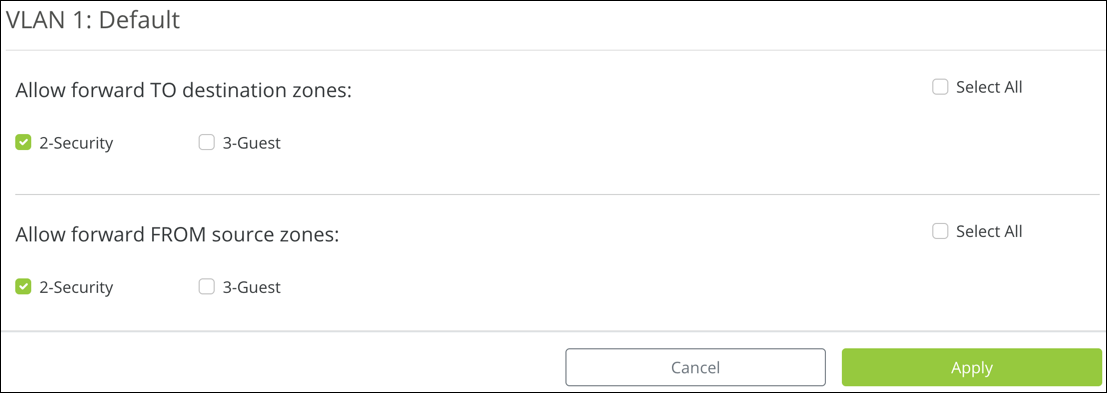
Select which VLANs to forward data TO, and the VLANs to receive data FROM. Then click Apply.
Note: You must enable this feature on each VLAN that you want to communicate with each other.
-
Device Management — Allows devices connected to this VLAN to access the router at its default gateway IP address.
-
LAN 1 and 2 — Each LAN port may be configured as one of one following options:
-
Untagged — VLAN frames handled through this port are not tagged with a VLAN ID.
-
Tagged —VLAN frames handled through the port are tagged with a VLAN ID.
-
Excluded — The port is not a member of the specified VLAN. This is the default setting.
-
Note: LAN ports can only allow Untagged traffic from one VLAN.
Click the trashcan to delete an existing VLAN. The default VLAN cannot be deleted.
DHCP Reservation Table
This shows a list of all DHCP addresses reserved by your system. DHCP (MAC) Reservations can be created in OvrC or the router.
Note: The AN-220-RT supports a maximum of 1024 DHCP clients and 256 DHCP reservation entries. The AN-520-RT supports a maximum of 2048 DHCP clients and 256 DHCP reservation entries.
Click Add DHCP Reservation to create a new reservation from this page. You must provide the MAC address of the device you wish to reserve.
Pro Tip: It’s easier to make the reservation in OvrC or under Status > Clients & Services > Client Table, then change the IP address on this page.

The Name field accepts alphanumeric (a - z and A - Z) characters, spaces, hyphens ( - ), underscores ( _ ), !, @, #, $, %, ^, &, *, (,), ?, +, and periods.
You can quickly Enable or disable reservations from this page. Or click the trash icon to Delete them.
To change the IP address of the reservation, enter the desired address under Static IP Address, then click Apply. Reservations can be made outside the IP range specified in the LAN settings.
Note: You must restart the reserved device for the change to take effect.
Firewall
Use this page for more advanced Firewall features, compared to the options on the Status > Clients & Services page.
-
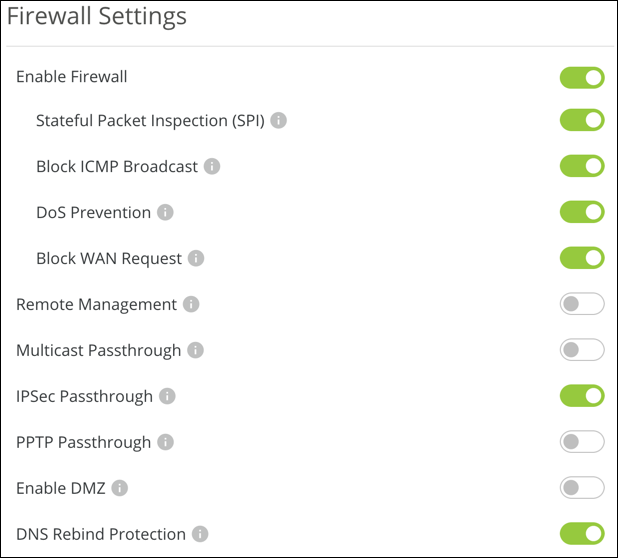
Enable Firewall — Toggle the Firewall settings on or off. Default is on.
-
Block ICMP Broadcast — Enabled by default, this feature prevents the router from responding to ICMP (Internet Control Message Protocol) probe packets.
-
SPI (Stateful Packet Inspection) — Inspects incoming and outgoing packets and their connection state. Enabled by default.
-
DoS (Denial of Service) Prevention — Prevents a Denial of Service attack, which attempts to make a network unavailable by flooding the network host with irrelevant traffic. Enabled by default.
-
Block WAN Request — Prevents the router from responding to ping requests on the WAN port, making your network seem invisible from the outside. Enabled by default.
-
Remote Management — Enable to configure a port to access the router remotely. The port must be configured under Settings > Firewall. Disabled by default.
Pro Tip: Use a VPN or OvrC WebConnect instead of Remote Management.
-
Multicast Passthrough — Enables multicast traffic to pass from WAN to LAN. Typically used when a multicast source is on the WAN side of the network. This applies to all VLANs. Disabled by default.
-
IPSec Passthrough — Allows IPsec VPN traffic to pass from WAN to LAN. Typically used in Double NAT topologies where there is an IPsec tunnel established upstream to the WAN side of this router. This applies to all VLANs. Disabled by default.
Note: This feature must be enabled for Wi-Fi calling to work for most phone providers.
-
PPTP Passthrough — Allows PPTP VPN traffic to pass from WAN to LAN. Typically used in Double NAT topologies where there is a PPTP tunnel established upstream to the WAN side of this router. Disabled by default.
-
Enable DMZ — Use this feature when the ISP does not support bridging or bypassing their firewall or NAT (Net Address Translation). You must enter the DMZ address in IPv4 format. Disabled by default.
-
DNS Rebind Protection — Enabled by default. DNS rebinding manipulates DNS (Domain Name System) responses to change the IP address associated with a domain name, causing a user's browser to unknowingly communicate with a different server than it originally intended to.
DNS Rebind Protection can prevent legitimate DNS resolution on networks with an internal domain or running security software that redirects all DNS lookups. If you suspect DNS Rebind Protection is causing an issue, check the router log for DNS-rebind entries.
Misc. Settings
-
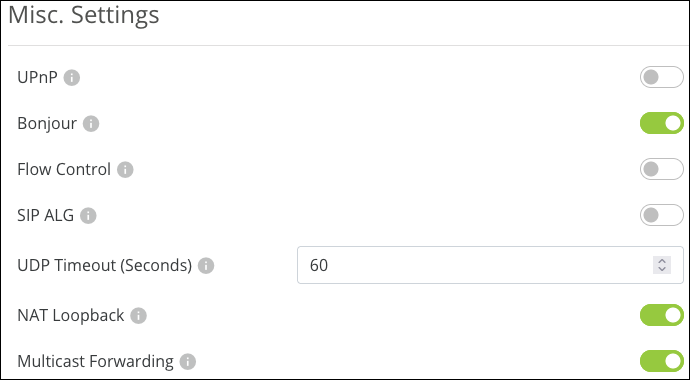
UPnP — Enables Universal Plug and Play (UPnP), a protocol that permits the network to discover and operate devices and applications seamlessly. Disabled by default.
-
Bonjour — Bonjour is Apple’s implementation of Zero Configuration networking, which allows users to search, locate, and set up Apple devices on the network. Enabled by default. This is required if Airplay or Screen Mirroring is in use on the network.
Note: Bonjour must be enabled in Safari’s Preferences. Then it is accessible in Safari’s Bookmarks feature.
-
Flow Control — Enables IEEE 802.3x protocols around managing congestion on the network. Only enable this feature if a use case specifically asks for it. Disabled by default.
-
SIP ALG — Enables the Application Layer Gateway, a feature that inspects and modifies VoIP traffic, so it is not rejected by the firewall. Consult your VoIP hardware and service provider before enabling this feature. Disabled by default.
-
UDP Timeout (Seconds) — The amount of time before the UDP session times out. Increase this value to ensure persistent connectivity of VoIP devices. Serves as Consistent NAT. Default value is 60.
-
NAT Loopback — Allows remote access mechanisms like DDNS to be used on the local network. For example, if you’re using a DDNS for remote access to a camera system, you can use the DDNS address while you’re connected to the local network. Enabled by default.
-
Multicast Forwarding — Allows multicast discovery protocols to communicate between VLANs. This requires InterZone forwarding.
DDNS
Dynamic DNS allows you to access the interface of local network devices from the Internet using a standard web URL instead of the WAN IP address.
Select the DDNS Mode to apply the a Global DDNS (across all interfaces) or if the DDNS is Interface-Specifc.

Select which DNS Service to use and enter your desired URL into the Host Name field, then click Apply. A unique ID (often two to four digits) is added to the hostname if that specific URL is already being used. If you do not like this assignment, try a different hostname or DNS service.

For example, If you choose myhome as your hostname, your system’s URL is myhome.AraknisDNS.com. If someone has already claimed the myhome URL, your DDNS URL would look like myhome13.AraknisDNS.com.
DDNS hostnames can include alphanumeric (a - z and A - Z) characters and hyphens ( - ). NO-IP and DynDNS accept periods for domain suffixes.
Port Forwarding
Network ports direct traffic between software applications running on network devices. Port numbers are always associated with a host IP address and a protocol type, usually TCP, UDP, or both (TCP/UDP).
Network HTTP traffic defaults to TCP port 80. When an address is entered in the web browser, the request is automatically sent to port 80 unless a different port is appended to the address. For example, if you access a device at IP address 192.168.1.20, the request is processed as if you entered 192.168.1.20:80.
When software from LAN devices needs access to and from the internet, additional ports may be forwarded to the device to allow communication through the router’s firewall.
Caution: Port forwarding is not a secure method of remote access. Consider using a VPN or OvrC WebConnect instead.
Common uses for port forwarding include:
-
Remote access for surveillance cameras and recorders
-
Computer games and server applications
-
Remote storage devices
-
Remote access for network device user interfaces (APs, managed switches, power monitoring devices)
Note: Many popular programs and protocols use specific port numbers by default. For instance, HTTPS services typically use port 443, and SMTP mail services typically use port 25.

To configure a port forwarding rule:
-
Click Add Forwarding Rule.
-
Enter the External port to be used when connecting to the device interface on an outside network. For example, if you enter 87, you’ll add:87 at the end of the URL.
-
If using multiple WANs, select the WAN port from the External Address dropdown with the ISP you want to use.
-
Enter the Internal Port that the local device application is using.
-
Enter a meaningful Name for the port forwarding rule. This field accepts alphanumeric (a - z and A - Z) characters, spaces, hyphens ( - ), underscores ( _ ), !, @, #, $, %, ^, &, *, (,), ?, +, and periods.
Port Triggering
Port Triggering is similar to port forwarding, except the ports only open when there is a specific request to open the port from an application.

The Name field accepts alphanumeric (a - z and A - Z) characters, spaces, hyphens ( - ), underscores ( _ ), !, @, #, $, %, ^, &, *, (,), ?, +, and periods.
Security
User Accounts
The first time you log into the Araknis router you must change the default password. To change the password again, enter a new Password, then enter it once more to Confirm and click Apply.

Note: The default username cannot be deleted.
Click Add User to add a secondary user to the router. You cannot set permission levels, but this does allow you to delete the user should they no longer require access to the router.
Usernames can contain alphanumeric (a - z and A - Z) characters, hyphens ( - ), underscores ( _ ), !, @, #, $, %, ^, &, *, (,), ?, +, and periods.
Passwords must contain at least 8 characters. This field accepts alphanumeric (a - z and A - Z) characters, hyphens ( - ), underscores ( _ ), !, @, #, $, %, ^, &, *, (,), ?, +, and periods.
Access Management
For security reasons, Enable HTTPS is enabled by default to encrypt all user communication with the router.
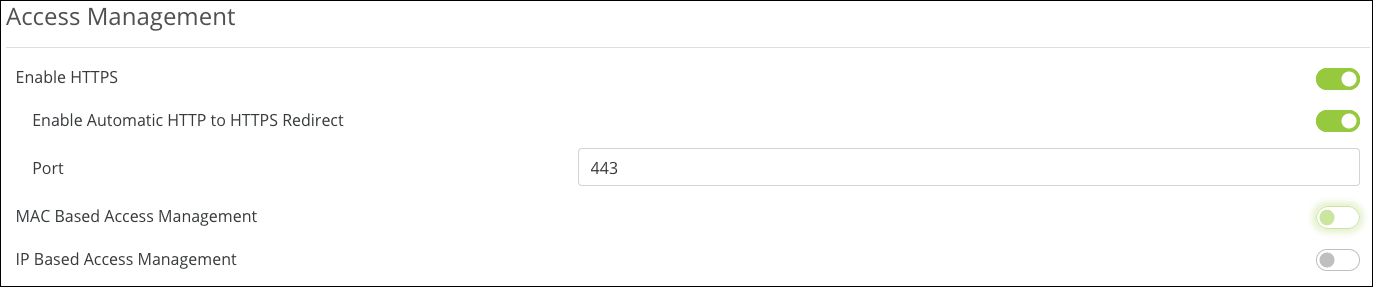
For convenience Enable Automatic HTTP to HTTPS Redirect is also enabled by default. This feature automatically takes you to the router’s user interface without manually typing the HTTPS port at the end of the address.
If disabled, you must enter the router's IP address and the HTTPS port to access the router’s interface. For example, 192.168.1.1:443.
A new HTTPS Port can be entered if you wish to use something other than the default 443.
MAC and IP Based Access Management
MAC Based Access Management limits access to the router’s interface to the MAC addresses listed in the table. Click Add MAC Address to enter up to 16 devices.

IP Based Access Management limits access to the router’s interface to the IP addresses listed in the table. Click Add IP Address to enter up to 16 addresses.

Note: You cannot use both MAC based and IP based access management at the same time.
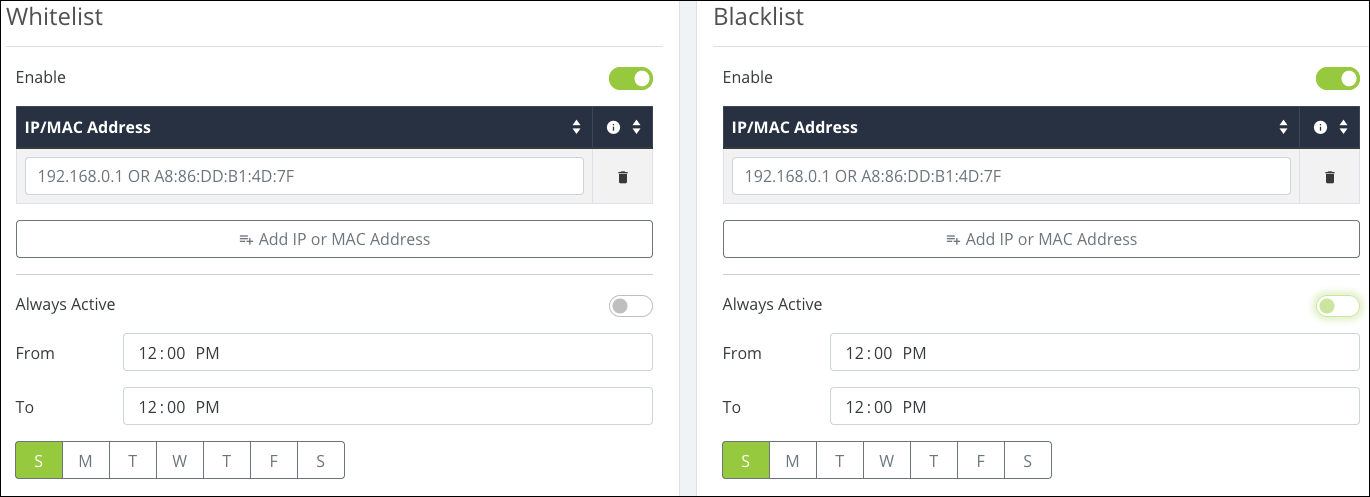
Whitelist & Blacklist
The Whitelist specifies which devices can access the network. This includes the local network and the internet.
Caution: All devices not on the whitelist will be blocked from network access.
The Blacklist specifies which devices cannot access the network.
Both options have a toggle to make the list Always Active, or you can set a schedule.