Deploying the Master access point
I. Unpack and install the Unleashed Master access point
Choose which Unleashed access point (AP) will become the Unleashed Master AP (the AP that performs all of the control functions of the Unleashed network).
Any hard-wired Unleashed AP can be the Master.
Do not connect multiple APs simultaneously. In the initial setup stage, select one AP as the Master AP and connect it to power and to the network, then complete the initial setup steps on this Master AP before connecting any other APs. Once setup is complete, you can continue connecting other APs to power and to the network.
Access Networks access points are designed to work with Power Over Ethernet (POE) switches. Other wiring methods may be used including POE Injectors and DC power supplies.

II. Log in to OvrC
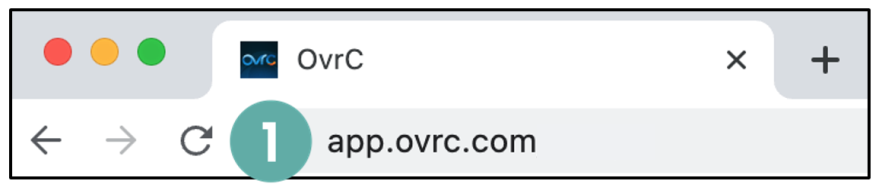
1. Log in to OvrC as you normally would. Enter the following address into the browser's URL bar, then press Enter:
app.ovrc.com.
2. Enter your OvrC credentials, then select LOG IN.

3. Go to the LIST tab, then select the appropriate system from the list.

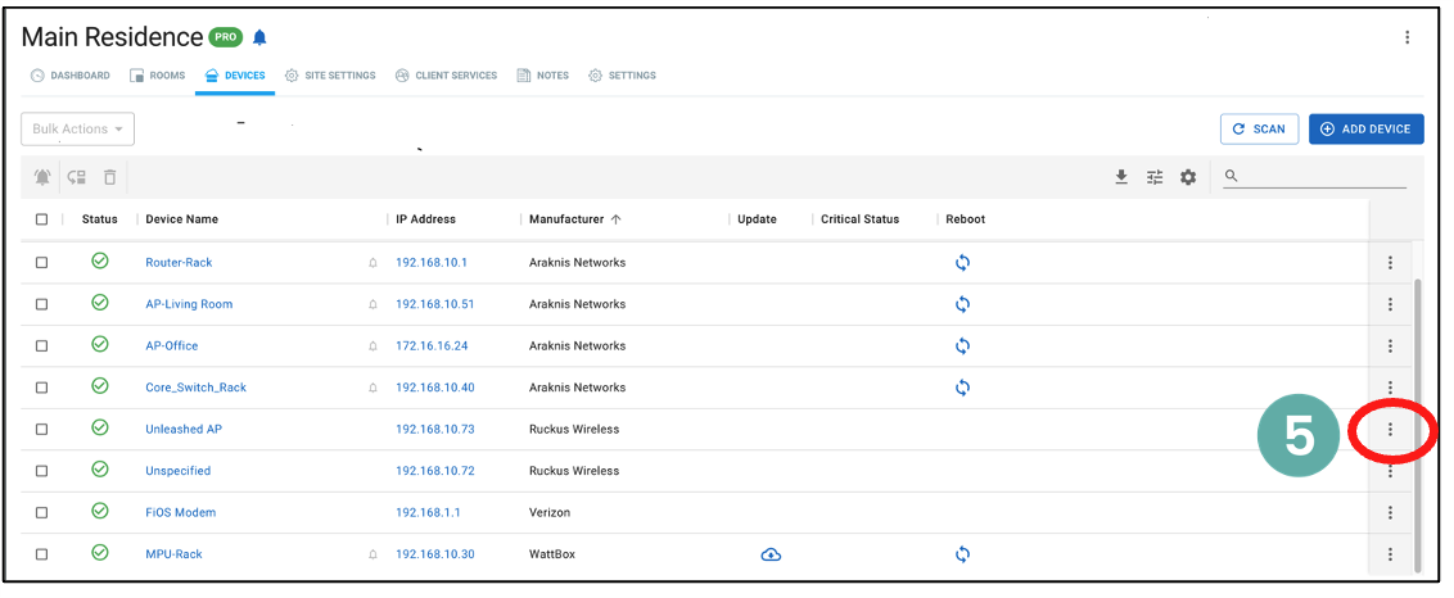
4. The initial view shows the DASHBOARD. Select the DEVICES tab to view the various OvrC compatible network devices assigned to the site.

5. Select the three dots next to the Master access point.
6. Then select Web Connect from the list.

7. You can also select the Master access point on the DEVICES tab, then select the Web Connect icon.


8. In the Web Protocols section, select CONNECT for Port 443. This will open a secure connection (https) to the Unleashed AP in a new browser tab.

Depending on the browser being used, you may be presented with a security warning stating "This connection is not trusted" (Firefox) or "Your Connection is Not Private" (Chrome) or “Content was blocked because it was not signed by a valid security certificate” (Edge). This is normal, as the Unleashed AP does not have an SSL certificate that is recognized by the browser.
9. Select Advanced.

10. Then select Proceed to xxx.xxx.x.x (unsafe).

III. Complete the Unleashed Installation Wizard
Basic configuration steps
Once you have accepted the security exception, you will be redirected to the Unleashed Installation Wizard which will guide you through the process of setting up the Unleashed Master AP.
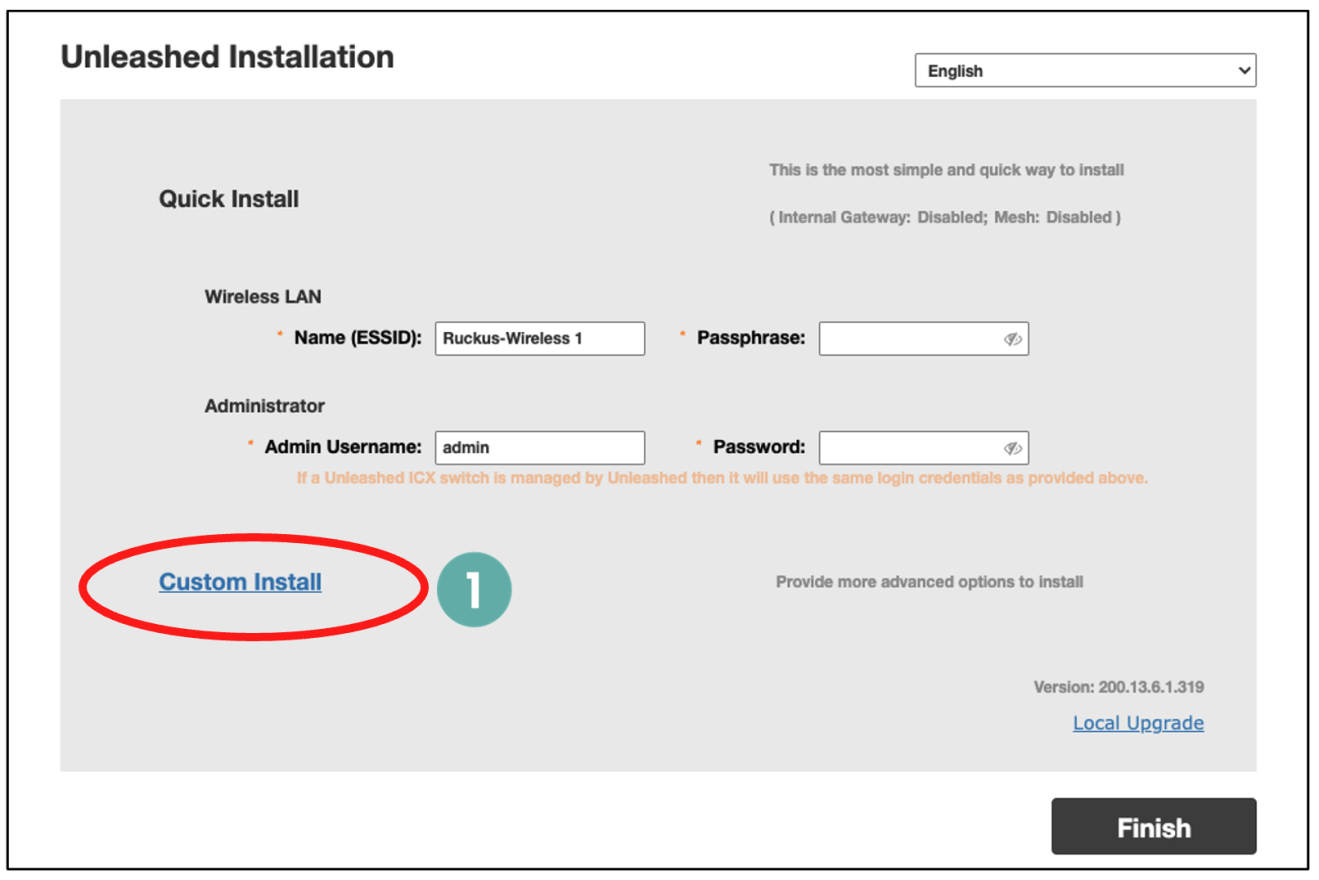
There are many ways of setting up an Unleashed Network by using the Unleashed Installation Wizard. This Deployment Guide focuses on the Custom Install process to set up the Unleashed network.
1. Select Custom Install to continue.
2. Select the Advanced Install option.
3. Select the Next button to continue.

1 System
1. Enter a System Name for the Unleashed system.
Access Networks suggests using the name of the job site such as “Smith_Residence”. Remember to use best practices from your company for the naming convention.
2. Select Next to continue.

2 IP Settings

For most installations, Gateway Mode should remain disabled.
Leave the Unleashed APs in DHCP mode.
A static Management Interface IP address should be established after the Installation Wizard is complete.
1. After viewing the IP settings, select Next to continue.
3 Wireless LAN (WLAN)
1. Enter a Name for the first wireless LAN.
2. Select Yes for Password Protect (WPA2) for this WLAN.
3. Enter a Password for the WLAN.
4. Select Next to continue.

Best practice suggests that the password must be no less than 12 characters and should also contain a combination of uppercase, lowercase, numbers, and special character symbols. An good example is: E@syP@$$w0rd!.
4 Administrator
1. Enter a system Admin Username.
2. Enter a system Password, then re-enter the password in the Confirm Password box.
3. Select Next to continue.

Follow the previously described guidelines when creating passwords.
Configure the Password Recovery option so that the system password can be reset in the event that the original username or password are lost or forgotten.
To configure the Password Recovery option:
1. Check the Password Recovery box.
2. Enter a Security Email, Security Question and Security Answer. Again, by filling this information out, the password can be reset if the username or password are forgotten.
3. Select Next to continue.

5 Review
1. Review the information shown.
2. Select show password to reveal the hidden Password and show security answer to display the Security Answer, if desired.
3. If everything is correct, select Finish.

A new pop-up window will display verifying that you are aware that the Unleashed AP will reboot once you continue and that the process will take a few minutes.
4. Select Yes to complete the setup.

Once the Yes button is selected, the Unleashed Master AP applies all of the settings that have been configured and then reboots. The Configuring system settings & rebooting page is displayed during this process.
Wait for the progress screen to complete before proceeding.

Once the setup is complete, the Congratulations! screen appears.
5. After the access point has rebooted, you will need to connect to the newly created WLAN. Our example is Smith Wireless.

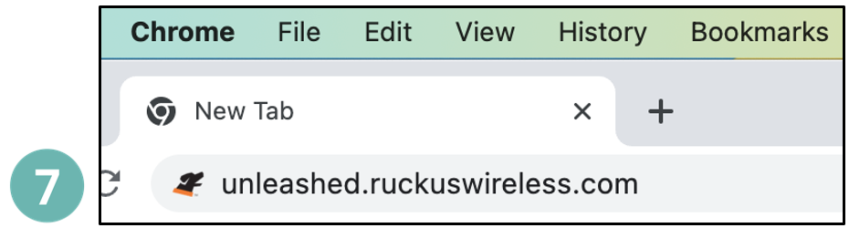
6. Select unleashed.ruckuswireless.com after you have connected to the new WLAN. You will then be redirected to the login page.

IV. Completing the initial setup
Connect to the Master AP
This is the Login page for the new Unleashed network.
1. Enter the previously created Username and Password.
2. Select Unleash to log in.

Unleashed Dashboard
After successfully logging in, you will be presented with the Unleashed Dashboard, which displays an overview of the Unleashed network.

At any point during the setup process, you can access the complete Unleashed User Guide by selecting Help in the upper right corner of the Unleashed web interface.
Configuring the Management Interface
A static Management IP address can be configured to allow the administrator to manage the Unleashed network from a single IP address.
The Management IP address redirects to the Unleashed Management Console regardless of the Master AP’s IP address.
1. Go to Admin & Services.
2. Select System on the left menu bar, then select IP Settings.
3. Select the Management Interface tab.
4. Select the checkbox next to Enable IPv4 in the Management Interface.
5. Enter an IP Address and Netmask (the standard Netmask is 255.255.255.0).
6. Select Apply.

The IP Address of the Management Interface must be on the same subnet as the AP’s IP address and it should differ from other devices on the subnet.
Create a Guest network
Every network deployment should have a Guest SSID to allow guests to have Internet access while isolating them from the rest of the network’s devices.
To fully isolate Guest wireless clients, they must be isolated from other devices that are connected to the same AP as well as all hosts on the same VLAN/Subnet.
First make a new WLAN:
1. Select anywhere in the Wi-Fi Networks section to expand the display of the deployed WLANs.
2. Select Create to open the Create WLAN pop-up page.


3. In the new dialog box, enter the SSID under Name.
4. Select WPA2 for the Encryption Method.
5. Enter the Password.
6. Select Show Advanced Options.

Passphrases that are simple to remember will be used more often by your client. A good suggestion for a simple Guest WLAN passphrase is beourguest.
7. Navigate to the Others tab.
8. Select the check box for Isolate wireless client traffic from other clients on the same AP next to Wireless Client Isolation.
9. Select the check box for Isolate wireless client traffic from all hosts on the same VLAN/subnet.
10. Now select the + symbol to create an Allowlist rule.

An Allowlist is used to identify the router as the only device that Guest network client devices can communicate with. This function allows Internet access while maintaining isolation from other devices.
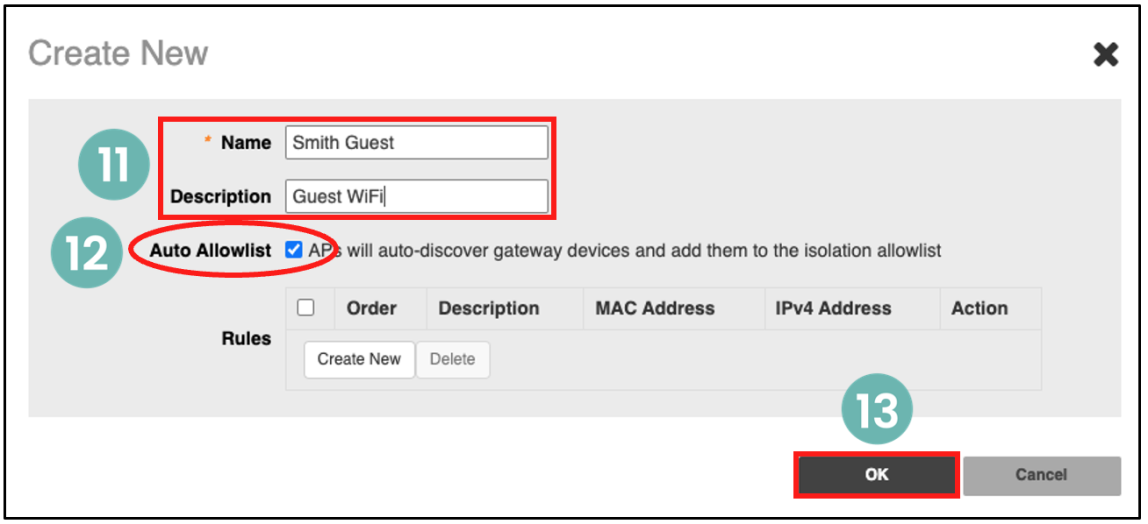
11. Select a Name for the AllowList, then add a Description.
12. Make sure that the Auto Allowlist box is checked.
Enabling this feature allows the Unleashed Master AP to identify the MAC address of the Gateway and automatically add it to the Allowlist.
13. Select OK to continue.
The Guest WLAN is now active and all traffic from Guest network client devices will be isolated from all other client devices on the network, while still maintaining Internet connectivity.
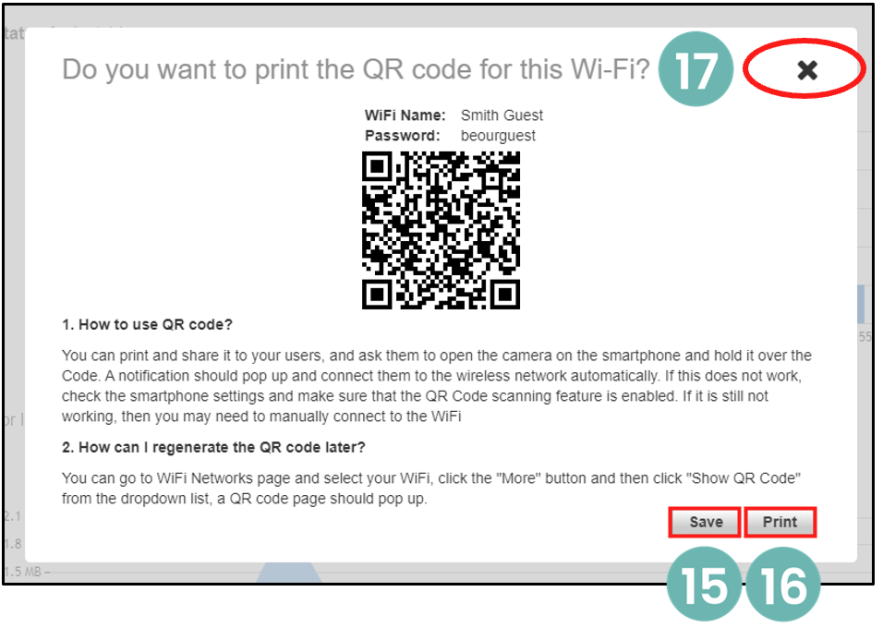
14. Select OK to open a new QR code window.

The QR code is used to provide access for Guest client devices and can be printed or saved for later use.
15. Select Save if you want to save the QR code to your computer.
16. Select Print to print a paper copy of the QR code.
17. Select the X to continue.
Access Point channel optimization
1. Under Admin & Services, select System.
2. Select Country Code from the sub-menu.
3. Select the option Optimize for Performance. This enables all available 5GHz channels.
4. Select Apply to continue.

A new dialog box appears to confirm AP optimization, including the Master AP.
5. Select Yes to continue.

After changing to Performance Mode, all APs will reboot. It is then necessary to review the channels available for automatic channel selection.
After the system has completed the rebooting process, log in to the network again.
6. Reconnect to the Unleashed Wi-Fi Network.

7. In the browser's URL bar, enter the following address, then press Enter: unleashed.ruckuswireless.com.
8. Enter the Username and Password previously created.
9. Select Unleash to log in.

10. Navigate to Access Points and select anywhere in the Access Points section to expand the display of the deployed APs.
11. Select Summary.
The Summary area is where global changes are made for all connected Unleashed access points.
12. Select Edit.

13. Select the tab labeled Radio 2.4 GHz.
14. Deselect the following channels: 2, 3, 4, 5, 7, 8, 9 and 10. This will limit automatic channel selection to channels 1, 6 and 11 on the 2.4GHz band.

To change the Auto settings for Channelization and TX Power for the 2.4 GHz Radio:
15. Under Channelization, select 20 MHz wide channel instead of Auto.
16. Switch the TX Power from Auto to Full power.

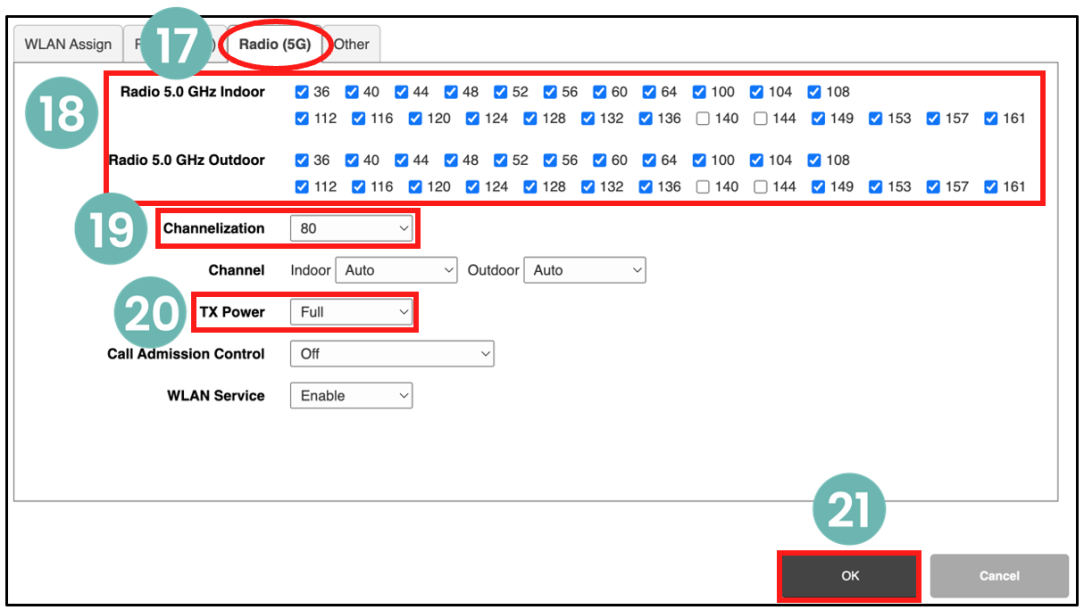
17. Select the tab labeled Radio (5G).
18. Review all of the new channels that are now available for ChannelFly.
19. Change Channelization from Auto to 80.
20. Change TX Power from Auto to Full.
21. Select OK to continue.
Automatic Channel Selection (Self Healing)
Unleashed access point use two different techniques for Self Healing a wireless deployment by identifying interference and measuring performance, then automatically changing the channels that each access point uses, in order to improve the client device experience.
Background Scanning is used on the 2.4GHz spectrum as it keeps a historical record of how many other devices are broadcasting on a specific channel and will then direct each AP to use the 2.4GHz channel that has the lowest number of direct interfering devices.
Channel Fly is used on the 5GHz spectrum as it not only records the number of direct interfering devices, but it also records the performance of authenticated devices and directs each AP to use the 5GHz channel that provides the best throughput.
1. Select anywhere on Admin & Services to reveal the sub-menus.
2. Select Services to reveal the sub-menus.
3. Select Radio Control from the left menu.

4. Navigate to the Self Healing tab.
5. Make sure that 2.4GHz channels are using Background Scanning.
6. Make sure that 5GHz channels are using ChannelFly.
7. Select Apply to continue.

8. Select the tab labeled Background Scanning.
9. Set Background Scan on 2.4GHz radio to every 300 seconds.
10. Set Background scan on 5GHz radio to every 300 seconds.
11. After these changes have been made from the default settings, select Apply to continue.
