Advanced Wireless Settings
Use this page to fine tune the performance of the AP.
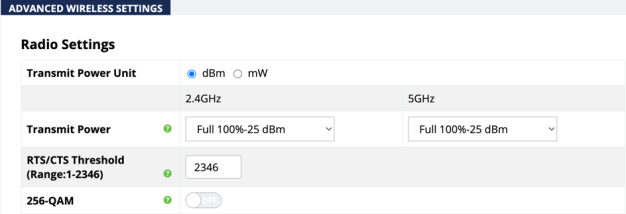
Radio Settings
Configure the transmit power for the radio interfaces,unit of measurement, RTS/CTS Threshold, and 256-QAM.
Path: Advanced > Wireless Settings > Radio Settings
Configurable Settings
-
Transmit Power Unit: Select the preferred unit of measure. dBm or mW.
Default: dBm.
-
Transmit Power: Select a setting from the drop-down to set the radio power. Higher power improves performance but can cause interference with other access points in close range on the same channel.
A higher coverage range also corresponds with lower throughput (i.e. to achieve the highest transmit power, the connection must run at the lowest data rate). Set this value as low as possible (for adequate coverage) to get the maximum wireless speed/data throughput.
Values are in dBm or mW, based on the Transmit Power Unit setting.
Default: Full 100%-25 dBm
-
RTS/CTS Threshold (Range: 1-2346): Enter a value for the threshold package size for RTS/CTS (request to send/clear to send). A lower number increases the frequency that the packets are sent and consumes more bandwidth.
Default: 2346
-
256-QAM: Can be toggled on to improve throughput performance on 2.4GHz band, but only fo compatible client devices.
Default: Off
Pro Tip: Do not toggle 256-QAM on unless you have a specific use case.
Click Save, then Apply Changes when you’re finished with the configuration.
Client Limit
Configure the maximum amount of client devices that can connect to individual radio interfaces.
Path: Advanced > Wireless Settings > Client Limit

Configurable Settings
-
Enable: Toggle on to enforce a Client Limit, by channel.
Default: Off.
-
Max Client No.: Set the maximum number of clients (between 1 and 127) that can be connected to a channel at a given time.
Default: 127.
Pro Tip: We recommend a network design that allows each access point to handle 30 client devices at any given time.
Click Save, then Apply Changes when you’re finished with the configuration.
Wireless Network Settings
Turn on more advanced features for specific SSIDs.
Path: Advanced > Wireless Settings > Wireless Network Settings

Configurable Settings
-
Client Isolation: Toggle on to prevent client devices connected to this SSID from communicating to client devices connected to a different SSID.
-
Band Steering: Toggle on to help move client devices to the radio interface with the strongest signal. Connected devices can still move between 2.4GHz and 5GHz channels, but the device must choose when to do so.
Note: Band Steering can only be turned on for SSIDs set to Both channels.
-
OFDM Only: Turn OFDM (Orthogonal Frequency Division Multiplexing) on to prevent 2.4GHz legacy 802.11b devices from connecting to the SSID. OFDM disables CCK (Complimentary Code Keying) rates of 1, 2, 5.5, and 11 and provides maximum throughput for 802.11 g devices.
Note: OFDM Only can only be turned on if the SSID is set to Both or the 2.4GHz Wireless Mode is configured for B/G/N, B/G, or AX.
-
WiFi6: Turn this feature off to allow incompatible Wi-Fi 5 devices to connect to the SSID. Wi-Fi 6 devices cannot use OFDMA and Target Wake Time (TWT).
Note: WiFi6 can only be turned on if the interface mode is set to AX.
-
DTIM (Deliver Traffic Indication Message): A message interval that can wake a device in a sleeping state. The higher the value the less often the device will be woken up, which can increase battery life but also increase the response time/latency.
-
MC/BC Threshold (Multicast/Broadcast-to-Unicast Conversion Threshold): Enter a value to dynamically adjust when multicast-to-unicast conversion is turned on.
-
0 = Always disabled
-
64 = Always enabled
-
20 = Default. Multicast-to-unicast conversion is disabled once the client count reaches this value.
Note: Broadcast and multicast traffic are always sent at the lowest basic rate. Heavy broadcast/multicast traffic can negatively impact high-bandwidth applications. Multicast traffic is not acknowledged by Wi-Fi receivers, so the access point cannot guarantee a receipt of broadcast/multicast traffic.
Unicast is sent at higher data rates so it can guarantee a receipt of each packet. Since unicast is a direct relationship between each client and the access point, additional clients added to the network add additional traffic overhead.
-
Click Save, then Apply Changes when you’re finished with the configuration.
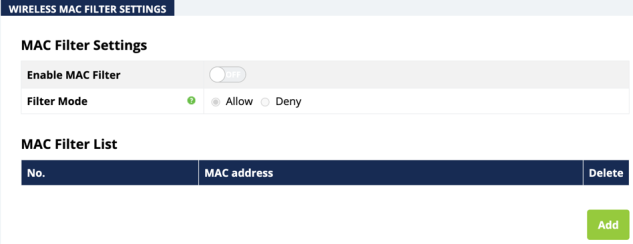
Wireless MAC Filter Settings
The Wireless MAC Filter determines if wireless client devices can access the wireless network by entering their MAC address in the filter list.
Path: Advanced > MAC Filter > MAC Filter Settings
How to Configure the Mac Filter
-
Toggle Enable MAC Filter to on.
-
Set the Filter Mode to Allow or Deny. Each selection populates a different list.
Selecting Allow shows the list of MAC addresses that can connect to the access point.
Selecting Deny shows the list of MAC addresses that cannot connect to the access point.
-
Click the Add button to add a MAC address to the list. If you’ve made a mistake, you can Delete the entry.
-
Click Save, then Apply Changes when you’re finished with the configuration.
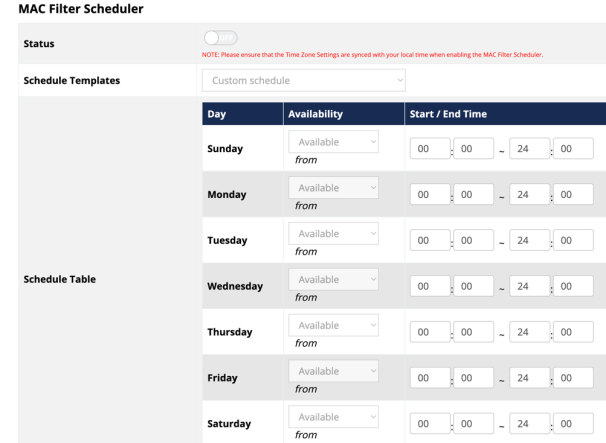
MAC Filter Scheduler
Use the MAC Filter Scheduler to only enforce the MAC filter during specific times.
Path: Advanced > MAC Filter > MAC Filter Scheduler
How to Configure the MAC Filter Scheduler
-
Toggle the Status to On.
-
Use the Schedule Templates to select one of the templates detailed below:
-
Always Available: The MAC Filter is always on. 00:00-24:00.
-
Available 8-17 Daily: 08:00-17:00. The MAC Filter is on at 8:00AM and off at 5:00PM.
-
Available 8-17 Daily Except Weekends: 08:00-17:00. The MAC filter is on at 8:00AM and off at 5:00PM Monday-Friday and always off on Saturday and Sunday.
-
Custom Schedule: Select to manually configure each day and time of the MAC Filter Schedule, using the Schedule Table settings.
-
-
To modify the template, use the Availability drop-down, next to the Day, to select whether the MAC Filter is Available (on) for the set duration, or Unavailable (off) for the specified day.
-
Enter or modify the Start and End Time, using the 24 hour format. 00:00 = midnight. Subtract 12 hours from 24 hour time to get the standard time. For example: 17:00-12:00 = 5:00PM.
-
Click Save, then Apply Changes when you’re finished with the configuration.